1-on-1 Meetings: Quarterly and Annual Discussions
1-on-1 meetings allow Managers and Team Members to have conversations that are stored indefinitely within Ninety.

Written by Amanda Barfield
Updated at February 10th, 2025
-
 Insights
-
 Data
Data
-
 Rocks
Rocks
-
 To-Dos
-
 Issues
-
 Meetings
-
 Headlines
-
 Vision
-
 Org Chart
-
 1-on-1
-
 Process
-
 Directory
-
Knowledge Portal
-
 Mastery
-
 Assessments
-
Partner Hub
-
 Integrations and Beta
-
 Account Options and Troubleshooting
-
Mobile (Beta)
Table of Contents
Quarterly and Annual Discussion
Within the 1-on-1 tool in Ninety, Managers can initiate Quarterly and Annual Discussions that help prepare both the Manager and the Team Member for a 1-on-1 meeting. It's not a performance review; it's a conversation. It's an opportunity to share what's working and what's not.
In Ninety, the steps to complete a Discussion are:
- The Manager creates the Discussion.
- Both parties fill out the forms prior to the scheduled meeting.
- The manager starts the meeting on the agreed-upon date in Ninety to see both responses in a side-by-side view.
- Meeting and Discussion are completed.
All discussions and answers are saved indefinitely within Ninety. They can also be printed out through PDF.
Role Permissions
- Owner, Admin, and Coach — Can see all Discussions in their company. Can create Discussions for any team.
- Manager — Can see all Discussions they're a part of. Can create (or delete) Discussions for their team.
- Team Member — Can see all Discussions they're a part of. Can create discussions. Cannot view all company discussions, or discussion settings.
- Observer — Does not see the 1-on-1 tool.
Creating a Discussion
- Click 1-on-1 from the left navigation.
- Click either the Quarterly Discussion or Annual Discussion tab.
- If there are no active Discussions, click the Create Discussion button. Otherwise, click + Quarterly Discussion in the upper right.
- Click Settings to change any functionality of the Discussion.
- Title the Discussion.
- Add a description.
- Choose a "Time Period" date range for Rocks, To-Dos, and KPIs included in the Discussion.
- Choose a "Due Date" for participants to complete the forms and have a meeting.
- Identify the Manager for the meeting.
- Initially, the Manager spot defaults to the user creating the Discussion.
- Click the Person icon to add a Team Member to the meeting.
- If this user has multiple roles, select only one Seat for this Discussion.
- Click Create Discussion. Once the Discussion is scheduled, Ninety sends a notification email to both the Manager and Team Member involved in the meeting.
Only the participants listed can complete the form.
Preparing the Forms
After creating the Discussion, you can click Start Form or Edit Form on the right of the screen to see the status of all forms for the Discussion. For more information on how to edit the questions and options within the form, read “Configuring Lead, Agree, Coach (LAC) Commitments and Annual Questions.”
The Team Member assesses their performance and then their Manager's. The Manager reviews their performance and then the Team Member's.
- Click Start Form.
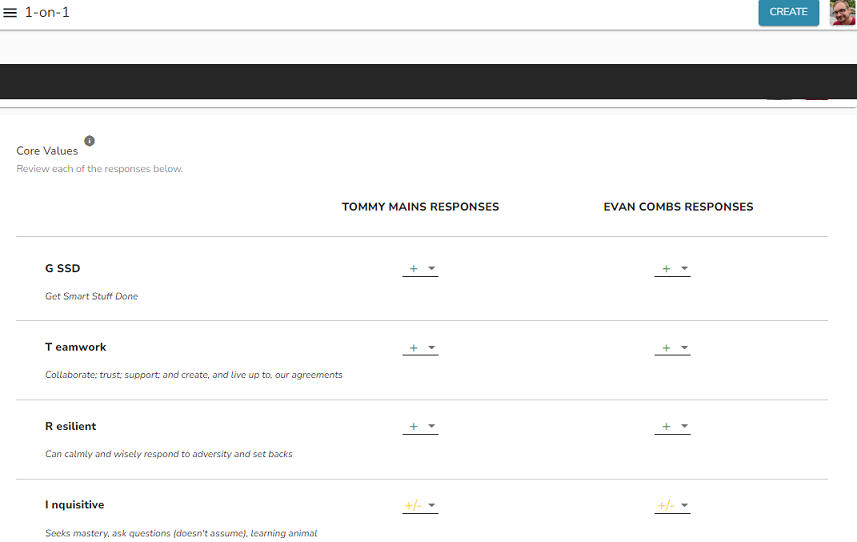
The first section assesses the Team Member on the company's Core Values, their Competency, Commitment, Capacity for the Seat, and their performance data on Rocks, To-Dos, and KPIs from each of their teams. - Next, the Manager is assessed. Ninety uses the Lead, Agree, Coach assessment for Managers.
- Click Finish on the bottom left of the screen to submit your form, or click Save for Later to return to the form at a later date.
Once you hit finish, you can no longer edit a Discussion form.
Editing the Forms
Overview Tab
After you've created a Discussion, you have the ability to edit various fields related to the forms and meeting. For example, if you schedule the Due Date as March 10th, but one of the participants has a conflict, you can change that Due Date without having to delete the current Discussion and create a new one.
Editable Fields: Name, description, and due date (only the Manager can edit the due date).
Edits can only happen before the Discussion as a whole is complete. A complete Discussion can mean a meeting was held, or forms are complete (if a meeting isn't going to be held). The discussion becomes locked at that point.
Settings Tab
Accessible and viewable by both users, but only the Manager on the discussion can edit the settings.
- Before someone starts the form, all the settings can be edited.
- Once the discussion is started, these cannot be edited. You see the message "Discussion in progress, these cannot be changed."
Completing the Forms
- Click Save for Later to save your progress at any time.
- After completing the forms, click Finish.
- The other Discussion member sees that the form is complete.
- Even after completing, clicking the Pencil icon allows you to edit your responses.
- After completing the form, click the PDF icon to export and print responses.
- Clicking on the Discussion opens the details panel on the right showing both parties' responses after the submission.
Holding the Meeting
After both parties have submitted their form responses, the option to Start Meeting displays. When started, the meeting shows a side-by-side comparison of the form responses.
Tip: Run the Discussion from only one person's computer. All entries are editable within the Discussion by either party.
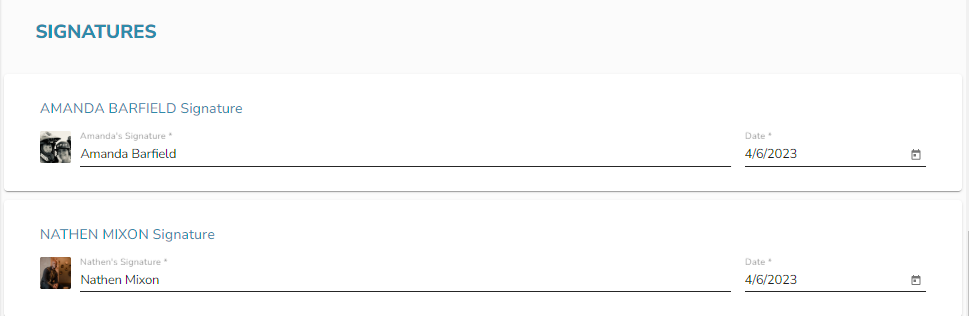
At the end of the meeting, each party electronically signs and dates the form — this step concludes the session. Users then mark the Discussion complete and archived.
Printing the Responses
After you complete the meeting, the responses are saved in Ninety.
You can also print the responses for your records:
- Click 1-on-1 from the left navigation.
- On the filters bar, toggle on Show Completed.
- Navigate to the Discussion you wish to print.
- Click the PDF icon next to the View Form link.
- Download the PDF and print it as needed.
Viewing Past Responses
- Click 1-on-1 from the left navigation.
- Choose either the Quarterly Discussions or Annual Discussions tab.
- Toggle Show Completed to on. This provides a list of all previously completed discussions, along with the following details and options.
- Manager name
- Team Member name
- Date it was completed
- PDF form — you can either view it here or you can print it out for your records
You cannot view past responses for deleted teams.